CS 318 - Compiling MPs
The Makefiles we have set up for the class assume that your source file name is mp#.c (replacing # with the appropriate MP number). This means that you MUST program in C. C++ features such as classes, templates, cout are not available to you. You must use only standard C headers and C library calls.Once you have written your program, you need to compile it to see if everything is okay. There are three methods we will discuss in this class:
- Compiling on WindowsNT in a DOS Command Shell using "nmake"
- Building a project on WindowsNT within the Microsoft Visual C++ IDE
- Compiling on the Sun Sparcs using "make"
For the purposes of the program that you intend to submit for grading, the first method is the ONLY method. Thus, if you use either of the other two methods during your program development, you still must use the first method to verify that your program is indeed correct. Why? Well, it is difficult (if not impossible) to duplicate a person's Visual C++ Project file, and the Sparcs are running Mesa (the OpenGL freeware alternative), which is not quite as good as the real OpenGL.
A special batch file has been written to allow you to compile your programs easily from a DOS Shell on WindowsNT. To compile your code, do the following steps:
- Make sure the public class directory is mapped as your G: drive. See Accessing the Public Class Directory for instructions.
- Using Explorer or My Computer, navigate to the G: drive.
- Double-click on the DOSShell icon. This is a special version of the DOS shell which sets environment variables needed for program compilation.
- In the DOS shell, navigate to the location of your mp#.c file.
- Type "G:\makewin mp#" where # is the number of the MP you are working on.
- Upon successful compilation, a file called mp#.exe will be created in the same directory.
These instructions tell you how to build a sample project under WindowsNT using the Microsoft Visual C++ IDE.
- Make sure the public class directory is mapped as your G: drive. See Accessing the Public Class Directory for instructions.
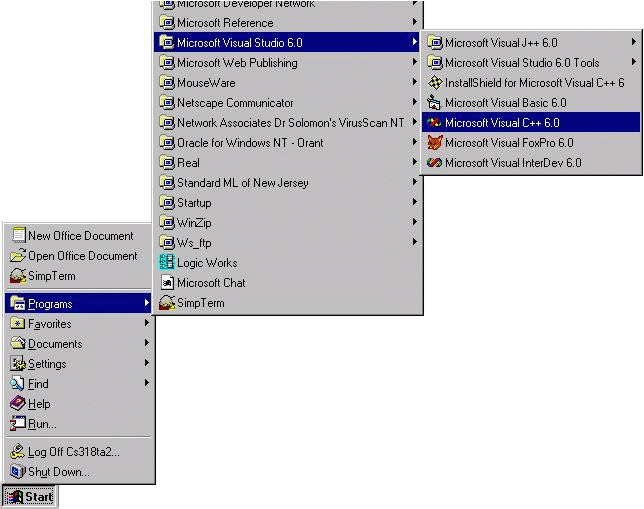
- Start Visual C++:

- Select "File -> New..."
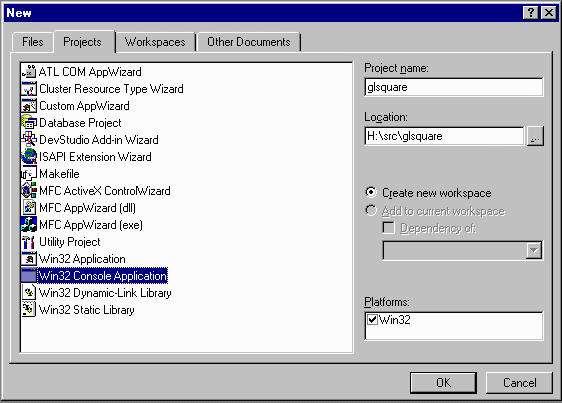
- Under the "Projects" tab, select "Win32 Console Application". The project name should be descriptive. For this example, use the project name "glsquare". Location should be in your remotely-mounted home directory (H:). (Click the "..." button to browse.) Then click "OK":

- In the Win32 Console Application dialog, select "An empty project" and click "Finish". Click "OK" at the New Project Information dialog.
- Select "File -> New..." again.
- Under the "Files" tab, select "C++ Source File". For your MP's, the file name must be of the format mp#.c. See Code Organization. For our example, use the file name "glsquare.c". Then click "OK":

- You would now enter your program, including appropriate comments. For our example, we will use a prewritten source file. Click in the newly created source window, then select "Insert -> File as Text..." Then navigate to the file G:\demos\glsquare.c. Select that file and click "OK". The text of that file should now be inserted into your glsquare.c source file.
- Select "Build -> Rebuild All". You may receive a message stating that your file has been modified. That is because clocks are not properly synchronized between the NT and Sparc's, so files saved on networked drives may have incorrect timestamps. Click "No" as needed to make the dialog box go away.
- Building should now be finished, and the bottom pane of the editor should show no errors:

If there are any errors, then fix them.
- Select "Build -> Execute glsquare.exe" to run your program. You should end up with a window displaying a white square on a black background:

- When you run MP0, you need to be able to specify command-line options. The easiest way to do this is to double-click on G:\DOSShell and run MP0 from the DOS command-line. However, you can specify command parameters in the Visual C++ IDE by doing the following:
- Select "Project -> Settings" (or type Alt+F7).
- Select the "Debug" tab.
- In the "Program Arguments..." text field, type the command-line arguments you want to use with your MP. Note that you do NOT need to enter mp0 as one of the arguments in this field.
- Click the "OK" button.
- Run your program as you normally would. Now, the program arguments will be passed on the command-line to your program.
A special script has been written to allow you to compile your programs on the Suns. Go to the directory containing your source code file, and type the following command at the command prompt:You will have to replace the # sign above with the number of the MP you want to compile. A file named mp# will be created in the same directory.~cs318/makesun mp#